We may earn a commission when you buy through links on this page, at no extra cost to you. How this works.
Stairs account for more than a million injuries each year in the United States, with older adults facing the highest risk of serious harm from a fall. Most of these incidents happen on indoor wooden stairs that look beautiful but offer little traction, especially when feet are damp or socks are worn. The gap between recognizing the hazard and actually doing something about it often comes down to two fears: that installation will be difficult, or that adding grip tape will ruin the wood finish you've worked hard to maintain.
Neither fear holds up under scrutiny. Installing non-slip grip tape on wooden stairs is straightforward work that requires no drilling, no special tools, and no expertise beyond the ability to measure and press firmly. The entire staircase can be completed in under an hour. Modern grip tapes use adhesives designed to bond securely during use but release cleanly when you need to remove them, leaving the finish intact if you follow basic preparation and removal steps.
The real tradeoff is not between safety and aesthetics - it is between accepting a modest visual change and living with a known fall risk. Grip tape is visible. It changes the look of your stairs. But it provides reliable traction in the exact spots where feet land, and that traction can mean the difference between a routine trip upstairs and a visit to the emergency room. For households with aging adults, guests with mobility concerns, or anyone who values independent living, that exchange is worth making.
This guide walks through every step of the installation process, from choosing the right tape and preparing your wood surface to applying it without bubbles and removing it later without residue. The goal is not perfection - it is confidence that your stairs will be safer tomorrow than they are today, with your wood finish protected throughout the process.
Choosing the Right Grip Tape for Wooden Stairs
The adhesive backing determines whether your tape will bond securely to wood yet release cleanly when you need to replace it. Acrylic adhesives grip well to sealed or finished wood without leaving sticky residue or pulling up varnish, polyurethane, or stain when removed. Rubber-based adhesives - common in industrial anti-slip tape - often bond too aggressively and can tear the finish or leave gummy patches that require solvents to scrub off.
Grit coarseness affects both safety and comfort. Indoor grip tape for wooden stairs usually rates 60 - 80 grit, coarse enough to prevent slips in socks or bare feet but not so sharp that it feels like sandpaper underfoot. Outdoor or industrial tape can reach 36 - 46 grit, which is unnecessary inside and uncomfortable for household traffic. If children or elderly adults walk barefoot on your stairs, lean toward the finer end of the indoor range.
Width matters for coverage and appearance. Most residential wood stair treads measure ten to twelve inches deep, and a four- or six-inch-wide tape strip centered on the tread provides traction in the high-traffic zone without covering edge detail or looking utilitarian. Tapes narrower than four inches may miss the outer footfall zones on wider treads; full-width tapes can obscure attractive wood grain and make the installation look commercial.
Moisture and UV resistance become important near entry doors or large windows. Standard indoor grip tape uses mineral grit embedded in a vinyl or polyester carrier that tolerates occasional damp mopping, but prolonged water exposure or direct sunlight can degrade the adhesive or fade pigmented tape. If your staircase sits within three feet of an exterior door that opens frequently, choose tape labeled for indoor-outdoor transition zones and inspect the bond every six months.
The practical difference comes down to tradeoffs: aggressive adhesive holds longer under heavy foot traffic but risks finish damage at removal; coarser grit maximizes slip resistance but sacrifices barefoot comfort; and wider tape covers more surface but hides more wood. Match the tape's specifications to your household's traffic pattern, footwear habits, and how much of the wood finish you want visible.
Step-by-Step Guide to Preparing Your Stairs
Surface preparation determines whether grip tape lasts six months or six years on wooden stairs. Most premature failures trace back to contamination left on the wood during installation, not adhesive quality.
Start by sweeping each tread to remove loose dirt and debris. Follow with a thorough wipe-down using isopropyl alcohol (70% or higher) and a clean, lint-free cloth. Work from the back of each tread toward the nose, applying moderate pressure to dissolve wax, furniture polish, body oils, and dust that accumulate on high-traffic stairs. These invisible residues block adhesive contact with the wood surface, creating weak spots that lift within days of installation.
Allow at least 15 minutes of drying time after cleaning before applying any tape. Alcohol evaporates quickly, but trapped moisture in wood grain needs time to escape. Installing tape over damp wood traps humidity beneath the adhesive, weakening the bond and encouraging edge curl.
Room temperature plays a larger role than most installers expect. Adhesive activates properly between 65°F and 80°F. Below that range, the adhesive remains stiff and may not form full contact with the wood. Above 80°F, the tape can become too pliable, stretching during application and contracting later as it cools. If your stairs feel cold to the touch, wait for the wood to reach room temperature or use a hairdryer on low to gently warm the surface before applying tape.
Different wood finishes require slightly different attention. Polyurethane and lacquer finishes clean easily with alcohol and bond well with quality grip tape. Oil-finished or waxed stairs need extra passes with fresh alcohol-dampened cloths until the cloth comes away clean, confirming all oily residue is gone. Unsealed or worn finishes offer excellent adhesion but may show slight discoloration from adhesive over time, so test a small corner first.
For the compatibility test, apply a two-inch square of grip tape in an inconspicuous corner of one tread. Press firmly, wait 24 hours, then peel it away slowly. Check for finish damage, discoloration, or adhesive residue. If the test area looks unchanged, proceed with full installation. If you notice dulling or sticky residue, consider a lighter-tack tape or consult the finish manufacturer for adhesive compatibility guidance.
The effort spent on this preparation stage directly determines how often you'll be reapplying tape. Clean, dry, room-temperature wood creates the foundation for grip tape that stays secure through years of foot traffic.
How to Measure, Cut, and Apply the Grip Tape Perfectly
Measuring and positioning each strip correctly prevents edge lifting, repositioning struggles, and wasted material. Start by measuring the full depth of one stair tread from back edge to nosing, then subtract a quarter-inch on each end to keep the tape away from the stair edge where foot traffic and cleaning can catch and peel it. Measure the width of the tread and subtract the same quarter-inch margin on both sides. Write these dimensions down before cutting any tape.
Cut your first strip on a clean, flat surface using sharp scissors or a utility knife with a straightedge. Rough or hurried cuts leave uneven edges that lift faster under foot pressure. Before peeling any backing, dry-fit the cut strip on the tread to confirm size and alignment. If the tread has a rounded nosing, position the front edge of the tape about half an inch back from the curve so the tape sits flat rather than folding over the edge.
Use small pieces of painter's tape along the sides of the tread as temporary alignment guides. These marks help you place the strip straight without eyeballing it each time. Once the dry fit looks square and centered, peel back only two or three inches of the backing paper from one end. Press that section firmly onto the tread, smoothing from the center outward to push air bubbles toward the edges. Work in short sections, peeling a few more inches of backing and pressing as you go, rather than removing all the backing at once.
Starting at the top stair and working your way down keeps you from stepping on freshly applied tape before the adhesive sets. It also means any alignment lessons you learn on the first tread improve your technique on the remaining stairs. If you place a strip crooked, lift it immediately and reposition while the adhesive is fresh; waiting even a few minutes makes removal harder and risks leaving residue. For stairs with visible wood grain or a delicate finish, avoid dragging the tape sideways during placement, which can scuff the surface.
Press each finished strip firmly with a roller or the flat of your hand, working from the center toward all four edges. This squeezes out trapped air and maximizes adhesive contact with the wood. Allow the tape to cure for the time recommended on the product instructions, usually 24 hours, before allowing full foot traffic.
Tips for a Smooth, Bubble-Free Finish
Air bubbles and wrinkles are the most common frustration during grip tape installation, but they're avoidable with the right technique. The key is applying firm, consistent pressure from the center of each strip outward toward the edges, which pushes trapped air ahead of the tool rather than sealing it underneath.
Use a squeegee or credit card wrapped in a soft cloth to smooth the tape as you lower it onto the stair tread. Start at the center line and work in one direction to the edge, then return to center and work toward the opposite edge. Apply enough pressure to feel the adhesive making contact with the wood, but not so much that you stretch or distort the tape itself.
If small bubbles appear after installation, you have a short window to lift the nearest edge and reapply that section. For bubbles smaller than a pencil eraser, a pin prick followed by firm pressure with the squeegee can release the trapped air without leaving a noticeable mark. Larger bubbles or wrinkles usually mean the tape needs to be lifted and repositioned entirely.
Temperature and humidity affect adhesion. Installing grip tape in temperatures below 50°F or above 90°F can prevent the adhesive from bonding properly. High humidity may cause the tape to feel slippery during application, while very dry conditions can make it grab too quickly, reducing your repositioning time.
Wait a full 24 hours before allowing heavy foot traffic on the newly applied tape. The adhesive continues to cure and strengthen its bond during this period. Walking on it prematurely can shift the tape or create new bubbles at the edges where the bond hasn't fully set. Minor imperfections that look obvious immediately after installation often become less noticeable once the adhesive has fully cured and the tape has settled into the wood grain.
How to Remove Grip Tape Later Without Damaging Wood
Grip tape installed with the right technique can be removed without harming your wood finish, which makes this safety upgrade reversible if your needs change. The key is using heat to soften the adhesive before you attempt to lift the tape, which prevents tearing and reduces the force needed to separate it from the stair surface.
Start by warming a corner or edge of the tape with a hairdryer set to low or medium heat, holding it a few inches away and moving it slowly across the section. Once the adhesive feels warm to the touch, use a plastic putty knife or your fingernail to lift the corner at a shallow angle - pulling straight up can leave more residue or damage the finish. Continue heating the tape just ahead of where you're peeling, working gradually along the length of the tread. The slower you go, the cleaner the result.
If adhesive residue remains after the tape is off, apply a small amount of isopropyl alcohol to a soft cloth and gently rub the area, testing first in an inconspicuous spot to confirm it won't affect the finish. Commercial adhesive removers labeled safe for wood also work, but always check compatibility with your specific finish type. Avoid abrasive pads or solvents like acetone, which can dull or strip protective coatings.
Tape that has been in place for more than a year may bond more firmly, so earlier removal tends to be easier. If you're planning to reposition or replace tape seasonally, the adhesive will stay more manageable. Testing removal on a small section after a few weeks also helps you gauge how the adhesive interacts with your particular finish and gives you confidence in the process before committing to a full staircase installation.
Peace of Mind in Under an Hour
Installing grip tape on wooden stairs takes less than an hour but delivers daily reassurance every time someone uses the staircase. The visual change is real - tape edges and texture become part of your stairs - but most households report they stop noticing the appearance within a week while the improved traction remains obvious underfoot.
A quiet weekend morning works well for installation. Traffic can resume once the adhesive has cured for the recommended period, usually two to four hours depending on temperature and humidity. No special skills are required, and mistakes during placement are easy to correct by lifting and repositioning within the first minute.
Grip tape ranks among the simplest aging-in-place upgrades because it requires no power tools, no permanent alterations, and no professional help. The safety improvement is immediate and measurable: secure footing on every step, in socks or shoes, dry or damp. For families concerned about falls or anyone planning to stay in a multi-story home long-term, this single-session project offers one of the highest returns on effort you can achieve.
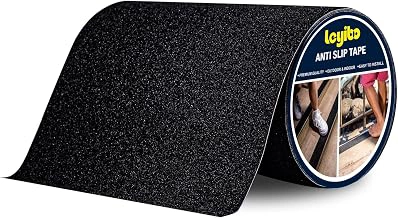
Anti Slip Tape 8" x 16' Outdoor for Stairs, Black
This 8-inch by 16-foot roll offers enough material to cover a typical residential staircase in a single purchase. The width works well for most standard treads, leaving a small margin on each side without requiring precise cuts to reach the edges. At $16.99 with a 4.5-star rating, the price covers a complete project rather than buying multiple shorter rolls.
The tape is marketed for outdoor use, which means the adhesive is formulated to bond firmly in weather and temperature swings. On indoor wooden stairs, that same strong bond requires careful surface prep and attention to the removal techniques covered in the next section. Skipping the cleaning or applying it over an existing finish that hasn't been deglossed can make future removal harder on the wood.
The 8-inch width suits treads between 9 and a larger amount deep, which is common in homes built after the mid-multipleth century. Measure your actual tread depth before ordering - stairs with deeper treads may show more bare wood on the sides, while narrower treads could require trimming. The black grit finish provides traction without the coarseness of multiple- or multiple-grit tapes that can catch socks or feel rough underfoot indoors.
Because this tape uses a weather-resistant adhesive, plan for a longer dwell time during removal. Heat and slow peeling will be necessary to avoid pulling finish or leaving heavy residue. If your stairs have a delicate or recently refinished surface, test a small piece on an inconspicuous area and remove it after multiple to confirm the bond strength matches your wood's tolerance.
- ✅ 16-foot roll covers a typical staircase in one purchase
- ✅ 8-inch width fits most residential treads with margin on each side
- ✅ Black grit provides indoor-friendly traction without excessive coarseness
- ✅ $16.99 price point for a complete project
- ⚠️ Outdoor-grade adhesive requires careful removal techniques on wood
- ⚠️ Strong bond may challenge delicate or newly refinished surfaces
- ⚠️ Width may not suit stairs with deeper or narrower treads without trimming
Tools and Materials You'll Need for the Job
- Non-slip grip tape (8-inch width works for most standard treads)
- Measuring tape or ruler
- Sharp scissors or utility knife
- Isopropyl alcohol (70% or higher) and clean cloth
- Pencil for marking cut lines
- Squeegee or old credit card (for smoothing)