We may earn a commission when you buy through links on this page, at no extra cost to you. How this works.
Traditional pump soap dispensers demand three motions that become difficult or painful when hand arthritis is severe: the pinch grip to stabilize the bottle, the downward press that loads finger and wrist joints, and often a twist to open the cap for refills. Each handwashing becomes a negotiation between hygiene and discomfort, and many people with arthritis begin to avoid the sink or rely on help that feels unnecessary for such a basic task.
A touchless soap dispenser removes all three barriers. The user places a hand beneath the sensor, and soap dispenses without gripping, pressing, or twisting. This is not about removing independence - it is about removing friction that compounds throughout the day. The change is especially meaningful for parents who value autonomy in personal care but face real limitations in hand strength and joint flexibility.
Setting up an automatic dispenser correctly makes the difference between a helpful tool and a frustrating gadget. Placement height, sensor sensitivity, refill access, and battery management all affect whether the dispenser integrates smoothly into daily routines or becomes one more thing to manage. The steps that follow focus on practical setup decisions that account for limited hand function, ensuring the dispenser works reliably when needed most.
What to Look For in a Dispenser: Key Features for Simplicity and Reliability
Choosing the right automatic soap dispenser starts with understanding the features that reduce hand strain during setup, daily use, and future maintenance. A parent with severe hand arthritis needs a model that removes every pinch, twist, and grip they would normally face at the sink.
Sensor sensitivity and placement matter immediately. Look for dispensers with wide, forgiving sensor zones that respond quickly to a hand held underneath - not just directly in front - so your parent doesn't need to search for the sweet spot or hold their hand in an awkward position. A sensor positioned low on the front face works better than one hidden at the top, because it requires less wrist extension.
The refill opening determines how manageable future soap changes will be. A wide-mouth top or a flip-lid design lets you pour soap without gripping a narrow cap or threading a bottle. Avoid models with small screw caps or tight-fitting lids that require torque to open. Some dispensers accept standard soap bottles directly, which eliminates the pouring step altogether if your parent can manage a light snap-on attachment.
Power source affects long-term ease. Rechargeable batteries reduce the frequency of battery swaps, but they introduce a charging cable that must be plugged in periodically. Disposable batteries are simpler to replace if you stock backups, but the battery compartment needs to open without resistance - spring-loaded covers that pop open with a gentle push are easier than sliding panels that catch. Consider who will handle battery changes in six months, and whether a charging reminder or a visible battery indicator will help.
Foaming soap dispensers use less liquid per pump and create lather without rubbing, which can be easier on stiff fingers. Liquid dispensers offer more soap variety and work with thicker formulations, but they may require more hand movement to build lather. Foaming models typically need diluted soap or foaming-specific refills, so plan for the right product on hand.
Mounting options shape both initial setup and daily stability. Countertop units need a non-slip base and enough weight to stay put when a hand moves underneath - lightweight plastic models can tip or slide. Wall-mounted dispensers remove clutter and place the sensor at a fixed, predictable height, but installation requires drilling or strong adhesive, and the dispenser must be positioned where your parent can reach it comfortably without leaning or stretching. If balance or mobility is a concern, a wall mount at the right height may offer more safety than a countertop unit that could shift.
Every feature you evaluate should answer one question: does this reduce the number of motions, the amount of force, or the precision required? Features that seem minor during shopping - battery door design, sensor width, lid type - become daily friction points when hand strength and dexterity are limited.
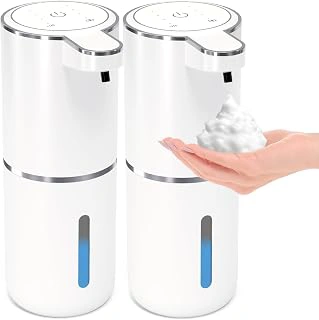
2 Pack Automatic Touchless Foaming Soap Dispenser, 12.8oz Rechargeable Wall Mounted
Finding a soap dispenser that works without gripping, twisting, or pressing can make a real difference when severe hand arthritis limits dexterity. This two-pack automatic touchless foaming soap dispenser addresses several practical challenges: the sensor activates without any hand contact, the foaming output comes out already lathered so there's no need to rub and work liquid soap into foam, and the rechargeable battery means no repeated struggle with small battery compartments.
Each unit holds a larger amount of diluted foaming soap, which translates to weeks of use before refilling becomes necessary. The wall-mount option keeps the dispenser stable and positioned at a height that works best for your parent, eliminating the need to hold or steady a countertop unit. Having two dispensers in the pack allows you to set up stations at both the kitchen and bathroom sink, so handwashing becomes easier throughout the home.
At $25.57 for both units, the upfront cost is higher than manual pumps, but the long-term ease of use and reduced caregiver time spent helping with handwashing can justify the investment. The 4.2 out of 5 rating reflects generally positive user experience, though some buyers note the sensor requires hand placement within a specific range to activate reliably. The rechargeable design means you'll charge via USB cable rather than replace batteries, which can be simpler for ongoing maintenance once the initial setup is complete.
This dispenser works best when filled with properly diluted foaming soap - using regular liquid soap without dilution can clog the pump mechanism. The touchless operation removes the physical demand of traditional pumps entirely, and the foaming format means less hand movement is needed to spread soap during washing.
- ✅ Touchless sensor eliminates all gripping and pressing
- ✅ Foaming output requires minimal hand manipulation
- ✅ Rechargeable battery avoids small battery compartment struggles
- ✅ Wall-mount option provides stable positioning at optimal height
- ✅ Two-pack enables setup at multiple sinks for $25.57
- ⚠️ Sensor requires hand placement within specific range
- ⚠️ Must use diluted foaming soap to prevent clogging
Step-by-Step Setup Guide: From Box to Countertop in Minutes
Opening the box and getting a touchless soap dispenser ready takes about ten minutes, and most of that time involves filling the reservoir and waiting for the sensor to respond. Start by unpacking the unit and laying out everything on a clean towel: the dispenser body, charging cable or battery compartment cover, and any included instructions or fill funnel. Check that the sensor window on the front is free of protective film or stickers, which can block detection.
If the model uses rechargeable batteries, plug the USB or proprietary cable into the charging port - usually on the back or bottom - and wait for the indicator light to show a full charge, typically one to two hours for a first-time charge. For AA-battery models, slide open the battery door, insert the batteries with the correct polarity, and snap the cover back into place. A person with reduced grip strength may find it easier to use a coin or the edge of a butter knife to pry open spring-loaded battery doors; there is no need to force it if fingers alone don't provide enough leverage.
Next, prepare the soap. If using a concentrate, dilute it in a separate measuring cup according to the label ratio before pouring; automatic dispensers work best with liquid soap that has the consistency of whole milk, not gel or foaming formulas unless the pump is specifically designed for foam. Twist or lift the reservoir lid - some models have a locking tab you press, others simply unscrew counterclockwise - and pour soap slowly until it reaches the maximum fill line, usually about three-quarters of the way up the chamber. Overfilling can cause drips or prevent the lid from sealing properly, so stop a quarter-inch below the line if you're uncertain.
Secure the lid by aligning any tabs or threads and pressing or twisting firmly until you hear a soft click or feel resistance stop. Wipe any soap off the exterior with a damp cloth before placing the dispenser on the counter, because dried soap can make the unit slippery to handle. Position it within easy reach of the sink - six to twelve inches from the faucet edge is a comfortable range - and make sure the sensor window faces the user's hand approach path.
Turn the unit on using the power button or switch, often located on the top or side panel. Hold your hand three to five inches below the spout and wait one to two seconds; the pump should hum briefly and release a measured dose of soap. If nothing happens, move your hand slightly closer or check that the battery compartment is fully closed and making contact. Some sensors require a palm-down, fingers-spread position rather than a cupped hand, so adjust the angle if the first attempt doesn't trigger a response.
Test the dispenser two or three more times to confirm consistent output, and adjust the dose setting if the model includes a dial or button for volume control - most units offer low, medium, and high settings that change the pump duration by half-second increments. Once the sensor responds reliably, the setup is complete. If the person who will use the dispenser has limited hand mobility, demonstrate the activation distance and hand position during this test phase so they know exactly where to place their hand without guessing.
Choosing the Right Soap and Refilling the Dispenser with Ease
Foaming dispensers work best with either pre-diluted foaming soap or a carefully measured mix of liquid soap and water - typically one part soap to four parts water. Using undiluted liquid hand soap or thick formulas can clog the pump mechanism and interfere with the motion sensor, leaving your parent frustrated and you troubleshooting a sticky mess.
Choose foaming soap refills with easy-open caps or flip-top lids, which require less grip strength and twisting. Store refill bottles at waist height so your parent doesn't need to reach overhead or bend low if they want to help. When it's time to refill, bring the dispenser to the sink rather than trying to pour over the counter. Place a small funnel in the reservoir opening to guide the soap and catch drips, then keep a hand towel within arm's reach to wipe any spills immediately.
A 12.8-ounce capacity means fewer refills - often once every three to four weeks for a single user washing hands several times daily. This reduces the physical repetition and minimizes the risk of spills that can make floors slippery or counters sticky. If your parent wants to participate, let them hold the funnel steady while you pour, turning the task into a shared moment rather than a chore they struggle with alone.
Avoid adding extra moisturizers, essential oils, or homemade soap blends unless the dispenser manual explicitly allows it; additives can gum up the pump or leave residue on the sensor window. Stick to simple, fragrance-free foaming formulas when possible, especially if your parent has sensitive skin or finds strong scents overwhelming. The goal is reliable, low-effort hygiene - not a chemistry experiment that ends in a clogged dispenser and a mess to clean.
Optimal Placement in the Bathroom or Kitchen for Safety and Convenience
Placement determines whether your parent can use the dispenser comfortably and safely every day. Start by observing where their hands naturally rest when they approach the sink - whether standing, leaning, or seated on a shower chair or rollator. The sensor window should sit at or slightly below that resting hand height, typically 6 to 10 inches above the counter surface for standing users, or lower if your parent reaches from a seated position.
Position the dispenser close enough to the basin that drips fall into the sink, but keep the sensor at least 8 inches away from the faucet stream. Water spray can trigger false activations or fog the sensor lens, leading to inconsistent dispensing. If the counter is narrow, angle the unit slightly inward so the nozzle overhangs the basin edge.
Countertop placement offers the simplest setup: no drilling, easy height adjustment, and you can relocate the unit if the first spot proves awkward. The tradeoff is surface clutter and a higher risk of accidental bumps, especially if your parent steadies themselves on the counter. Wall-mounted dispensers free up counter space and stay out of the way, but require finding a stud or using heavy-duty adhesive strips rated for the dispenser's filled weight - often 1.5 to 2 pounds. Test the location with painter's tape and a cardboard mock-up before committing to screws or permanent adhesive.
Place a hand towel within arm's reach of the dispenser, ideally on the same side as the soap, so your parent doesn't need to pivot or cross their body while hands are wet and slippery. If the bathroom has grab bars, position the dispenser on the same wall to create a compact, stable task zone. Avoid spots near the toilet or shower where humidity and accidental contact are more likely.
Run a dry test: have your parent stand or sit in their usual position, extend one hand toward the proposed dispenser location, and hold it there for three seconds. If the reach feels strained, the wrist bends awkwardly, or balance wavers, adjust height or move the unit closer. Small changes - two inches lower, three inches to the left - can make the difference between daily independence and frustration.
Pre-Installation Checklist: What You'll Need
- Automatic soap dispenser (charged or with fresh batteries installed)
- Foaming hand soap or diluted liquid soap concentrate
- Small funnel for easier refilling (optional but helpful)
- Mounting hardware if wall-mounting (often included with dispenser)
- Level tool or painter's tape for placement testing
- Towel or cloth for cleanup during initial fill and testing
Introducing the New Dispenser to Your Parent: A Guide to Gentle Persuasion
Introducing the New Dispenser to Your Parent: A Guide to Gentle Persuasion supports the article by focusing on How to Set Up an Automatic Soap Dispenser for a Parent with Severe Hand Arthritis and keeping the advice grounded in practical tradeoffs. Address the emotional and autonomy concerns: frame the dispenser as a convenience upgrade rather than a medical device, demonstrate its simplicity first rather than explaining at length, let your parent try it themselves immediately, acknowledge any resistance without arguing, and emphasize that the old soap bottle can stay as backup. Offer language that respects independence while making the benefit clear.
Troubleshooting Common Issues: Clogs, Battery Life, and Sensor Glitches
Even the best automatic soap dispensers can run into occasional problems, but most issues have straightforward fixes that don't require any technical expertise. Understanding what causes sensor glitches, battery drain, and clogs helps you keep the dispenser working reliably for your parent.
When the sensor stops responding, start with the simplest checks: confirm the battery is charged or fresh, and look at the soap level - many dispensers won't activate when nearly empty. Wipe the sensor window gently with a soft, slightly damp cloth to remove any soap residue or dust that might block the infrared beam. A clean sensor window restores responsiveness in most cases.
If the dispenser releases too much or too little soap, the issue often comes down to soap viscosity or sensor sensitivity. Dispensers designed for foaming soap will struggle or clog if you use thick liquid soap, so always match the soap type to what the manufacturer specifies. Some models include a dial or button to adjust how much soap is dispensed per activation - consult the manual and test a few settings until you find the right amount for your parent's needs.
Clogs typically happen when soap dries inside the pump mechanism or nozzle. Flush the pump by removing the soap reservoir, rinsing it with warm water, and running a few cycles of plain water through the dispenser until it flows freely. Prevent future clogs by using properly diluted foaming soap and keeping the nozzle clean after each refill.
Battery life varies, but rechargeable dispensers usually need charging every four to six weeks depending on use. Establish a simple charging routine - mark it on a calendar or set a phone reminder - and keep the charging cable in an easy-to-reach spot near the dispenser. If you're using a model with disposable batteries, store backups in a drawer close to the sink so you can swap them quickly when the dispenser slows down or stops working.
Occasional troubleshooting is normal, but regular sensor cleaning, proper soap selection, and attentive battery care will minimize disruptions and keep handwashing accessible for your parent.
A Small Upgrade for Meaningful Independence
Installing a touchless soap dispenser is a straightforward modification that can reduce hand strain and preserve independence for someone managing severe arthritis. The entire setup process - mounting, filling, and testing - takes less than fifteen minutes, yet the daily benefit compounds each time your parent washes their hands without twisting a pump or gripping a slippery bottle.
This single change won't solve every challenge, but it removes one small source of pain from a routine that happens dozens of times each day. Over the first week, watch how your parent interacts with the dispenser. If they need to bend or reach uncomfortably, adjust the height. If the sensor requires them to hold their hand perfectly still, try repositioning the unit or switching to a model with a wider detection zone.
Adaptive equipment works best when it fits naturally into existing routines. A well-placed automatic dispenser can make handwashing easier without drawing attention to limitations, which matters for dignity and willingness to use the tool consistently. As you think about other areas of the home, remember that small, targeted changes - grab bars near the tub, lever-style door handles, or jar openers in the kitchen - add up to a more comfortable and confident daily life.
The goal is not to overhaul the entire house at once, but to identify friction points and address them thoughtfully. An automatic soap dispenser is a low-cost, low-risk first step that demonstrates how simple adjustments can yield real improvements in comfort and autonomy.