Setting up a smart home safety system for an aging parent means walking a careful line: reducing fall risk and emergency response time without creating constant surveillance or stripping away independence. This checklist is for adult children who need visibility into safety risks - medication reminders skipped, stove left on, overnight bathroom trips - but want to respect privacy and avoid turning the home into a monitored facility.
The tension is real. Too little monitoring and a fall might go unnoticed for hours; too much and your parent feels watched, infantilized, or reluctant to use their own home freely. The solution is a three-layer approach: monitoring tools that alert you to emergencies without constant video feeds, sensors that passively track patterns (motion, door contact, temperature) rather than broadcast live audio, and installation choices that minimize drilling, wiring, and permanent changes to a home your parent may not own.
This guide walks room by room through the highest-priority risks - bathroom falls, kitchen fires, nighttime disorientation, front-door wandering - and compares specific device types by setup complexity, battery life, false-alarm rate, and how invasive they feel to the person being monitored. You'll see which sensors require hubs, which work standalone, and where cellular backup or landline integration matters most. The goal is a system that degrades gracefully: if Wi-Fi drops or a battery dies, the failure mode should be obvious, not silent.
Common mistakes include over-relying on voice assistants your parent won't use, placing motion sensors where pets trigger constant alerts, choosing cameras that record everything instead of event-triggered stills, and skipping the conversation about what happens when an alert fires - who responds, how quickly, and whether your parent understands the system well enough to silence false alarms themselves. By the end of this checklist, you'll know which tools to deploy first, which rooms justify more invasive monitoring, and how to validate that the system actually reduces risk rather than creating new frustration.
What Matters Most: The Three Safety Layers
- Layer 1: Visual monitoring for high-risk times (night, morning routine, medication windows)
- Layer 2: Motion and door sensors for wandering, fall detection, and activity tracking
- Layer 3: Secure, no-drill installation that won't damage walls or intimidate non-technical users
- Prioritize high-traffic fall zones: bathroom entry, bedroom exit, stairway landings
- Choose devices your parent can see and understand - avoid hidden cameras or complex hubs
- Start with one or two devices, validate acceptance, then expand coverage
Room-by-Room Safety Priorities
- Bathroom: Motion sensor near entry to detect falls or long stays; night vision monitor if balance is a concern
- Bedroom: Bed exit sensor or motion detector for nighttime wandering; video monitor for medication adherence if needed
- Front and back doors: Contact sensors to alert if parent leaves house during unsafe hours
- Kitchen: Motion sensor to confirm daily activity; consider smart plug for appliances if forgetting to turn off stove is a risk
- Hallways and stairs: Motion-activated lighting (separate from monitoring) to prevent trips; sensors optional for activity tracking
- Living room: Video monitor if this is primary daytime location; motion sensor as backup activity confirmation
Common Mistakes to Avoid
- Installing too many devices at once - start with 1-2 zones, get buy-in, then expand
- Choosing smartphone-only systems when parent or caregiver isn't tech-comfortable - pager alerts are more reliable
- Hiding cameras or sensors to avoid resistance - transparency builds trust and acceptance
- Ignoring surface prep for adhesive mounts - clean, dry surfaces prevent sensor failures and false alarms
- Skipping risers on uneven trim - gaps cause missed alerts and erode confidence in the system
- Over-monitoring low-risk areas while ignoring high-risk zones like bathroom entry or exterior doors
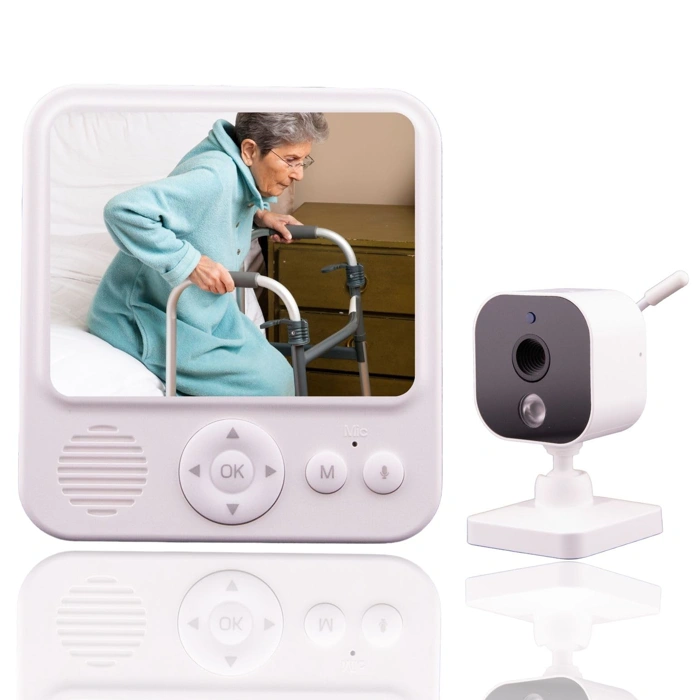
Smart Caregiver Video Monitor for Elderly Care, Portable, Rechargeable, Night Vision
The Smart Caregiver Video Monitor offers a straightforward solution for families who want visual check-ins without installing permanent cameras or requiring an elderly parent to manage smartphone apps. This portable, rechargeable unit sits on a nightstand or shelf and provides a real-time view of a bedroom, living room, or any single space where monitoring matters most.
The night vision feature makes it practical for after-dark checks - you can see movement, posture, and general activity even when the lights are off. The rechargeable design reduces the need for constant battery swaps, though it does require regular charging discipline to avoid gaps in coverage.
Compared to fixed smart cameras, this monitor trades whole-home coverage and cloud recording for simplicity and portability. You can move it between rooms as routines change, and there's no monthly subscription or cloud account to manage. Compared to smartphone-only setups, it's easier for a non-technical senior to accept because it doesn't feel like surveillance tied to the internet.
The tradeoffs are clear: this monitor covers only one room at a time, stores no video history, and depends on you remembering to recharge it. If you need multi-room visibility or want motion alerts sent to your phone, a networked camera system will be a better fit. If your parent values privacy and you want a low-friction way to glance in during evening hours, this portable monitor delivers that focused function at $54.95.
It works best when paired with other safety layers - motion sensors in hallways, medication reminders, or a medical alert pendant - so that video monitoring complements rather than replaces broader safety measures. For families starting a smart home safety checklist, this monitor is a flexible Layer 1 choice that respects independence while offering reassurance.
- ✅ Portable and rechargeable - move between rooms as needed
- ✅ Night vision for after-dark visibility
- ✅ No subscription or cloud account required
- ✅ Easier for non-tech seniors to accept than networked cameras
- ⚠️ Single-room coverage only
- ⚠️ No cloud recording or motion alerts
- ⚠️ Requires regular charging discipline
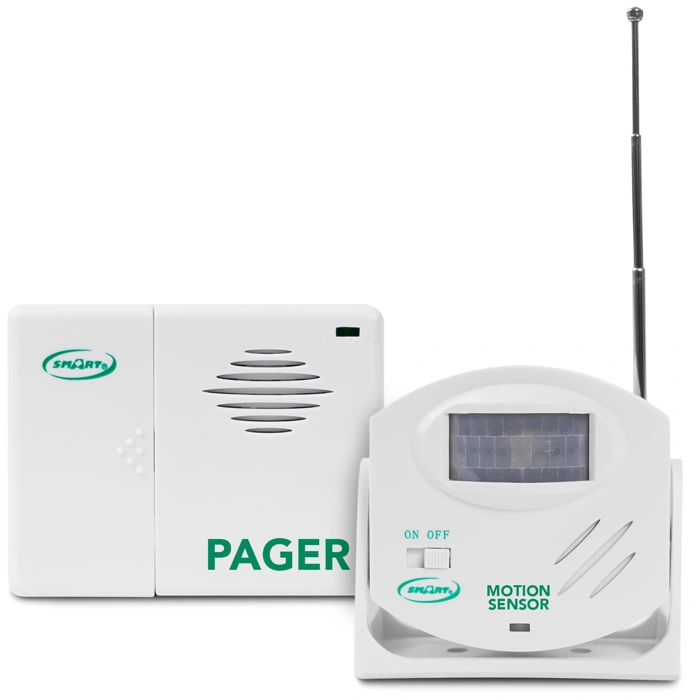
Amazon.com: Smart Caregiver Wireless Motion Sensor Alarm System with Pager for Fall and Wandering Prevention | Mountable Motion Detector Alarm Alerts Medical Caregiver with Up to 300' Range | Bed or Door Movement : Industrial & Scientific
The Smart Caregiver Wireless Motion Sensor offers a straightforward approach to wandering and bed-exit monitoring without requiring a smartphone or app installation. The system pairs a mountable motion detector with a wireless pager that alerts caregivers when movement is detected within the sensor's coverage area, with a range of up to 300 feet between the sensor and pager.
This design works well for families who want simple, dedicated monitoring rather than integrating sensors into a broader smart-home ecosystem. You mount the sensor near a bedroom door, hallway entrance, or beside the bed, and the pager stays with the caregiver - whether in another room, the yard, or a nearby cottage. When the sensor detects motion, the pager sounds an alert immediately. No Wi-Fi configuration, no account setup, and no smartphone dependency.
Compared to app-based motion systems, this trade gives up remote notifications, activity logs, and multi-device alerts, but it reduces the learning curve and the risk of a parent accidentally disabling notifications or the app crashing during a critical moment. Compared to pressure mats placed under a mattress or at the bedside, the motion sensor is less intrusive - no physical contact required - but it may also pick up unintended movement if placed in a high-traffic area or if a pet crosses the detection zone.
Setup involves mounting the sensor using included hardware or adhesive strips, pairing it with the pager (typically a one-button process), and positioning the sensor to cover the zone you want to monitor. The pager requires periodic charging, and you'll need to keep it within range and within earshot. If the pager is left in a drawer or the caregiver steps too far away, alerts will be missed.
This system fits scenarios where a parent is at moderate risk of wandering at night, getting up without assistance, or exiting through a specific door. It's particularly useful when the caregiver is on-site but in a different part of the house, or when a hired aide needs immediate notification of movement. For caregivers who travel or work outside the home, an app-based system with remote alerts may be a better match. For parents who are highly mobile and move through multiple rooms, a network of sensors with centralized monitoring offers broader coverage, though at higher cost and complexity.
The 300-foot range works in most single-family homes, but walls, appliances, and metal structures can reduce effective distance. Test the range in your specific environment before relying on the system overnight. The motion sensor runs on batteries, so plan for replacements every few months depending on activity level.
Priced at $29.95, this system represents one of the more affordable dedicated caregiver alert tools. The simplicity and low cost make it easy to deploy quickly, and the lack of subscription fees or ongoing service requirements keeps long-term expenses predictable.
- ✅ 300-foot wireless range covers most single-family homes
- ✅ Pager alert works without smartphone or app setup
- ✅ Mountable design minimizes intrusion compared to pressure mats
- ✅ Simple pairing process and straightforward installation
- ✅ No subscription fees or ongoing service costs
- ✅ Priced at $29.95 for affordable, dedicated monitoring
- ⚠️ No remote notifications for caregivers away from home
- ⚠️ Pager must stay charged and within range to receive alerts
- ⚠️ May detect unintended movement from pets or high-traffic areas
- ⚠️ No activity logs or historical data
- ⚠️ Battery-powered sensor requires periodic replacement
- ⚠️ Range can be reduced by walls and metal structures
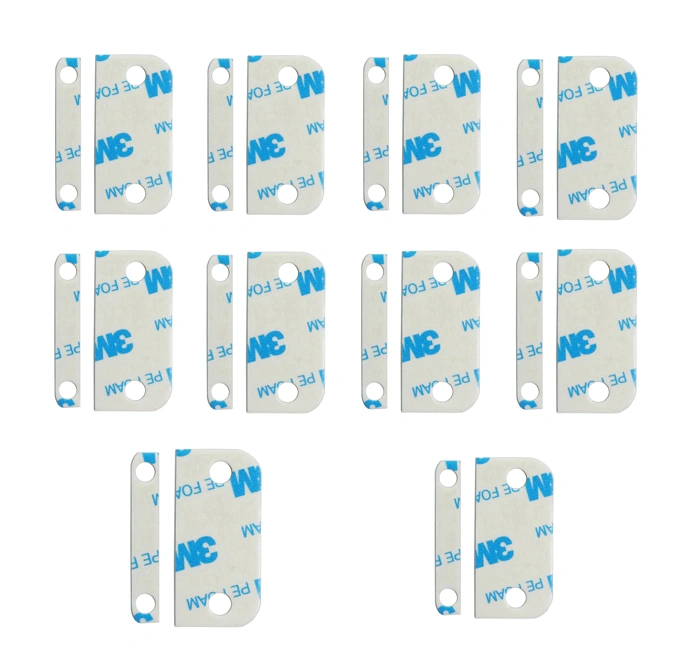
Amazon.com: Replacement Adhesive for Ring Alarm Contact Sensors & Magnets (2nd Gen) – Double-Sided Mounting Tape for Secure Installation, Pack of 10 Sensor Pads & 10 Magnet Pads, Pre-Cut, No Cutting Needed : Industrial & Scientific
When original adhesive on Ring contact sensors begins to lose grip, or when moving sensors to new positions, these pre-cut replacement pads offer a straightforward no-drill alternative. The pack includes 10 sensor pads and 10 magnet pads designed to match the footprint of Ring Alarm Contact Sensors (2nd Gen), eliminating the need to measure or cut.
For older adults who are cautious about changes to their home - or for adult children installing safety sensors in a rental or a parent's carefully maintained house - adhesive mounting avoids the permanence and visible marks of screw installation. The pads apply cleanly to smooth, flat surfaces such as painted door frames, metal frames, and sealed wood trim. Each pad uses double-sided tape with enough hold to keep sensors stable during everyday door and window operation.
The primary tradeoff is surface compatibility. Adhesive-only mounting may struggle on textured walls, porous wood, or surfaces with residual dust or moisture. Application requires a clean, dry base and firm pressure during initial placement; skipping these steps reduces bond strength and increases the chance of sensor drift or detachment. In contrast, screw mounts provide a more secure, long-term attachment on any surface but require drilling and leave visible holes if removed - a concern for renters or families who want minimal visible change in a parent's environment.
Compared to relying on the original factory adhesive that ships with Ring sensors, replacement pads extend the useful life of the hardware without purchasing new sensors. They also allow repositioning as monitoring priorities shift - for example, moving a sensor from a seldom-used side door to a medication cabinet or basement entrance as mobility patterns change.
At $6.93 for 10 pairs, the cost is modest, though buyers should verify surface smoothness and commit to proper cleaning and application. If door trim creates a gap between sensor and magnet, a small shim or riser accessory may be needed to maintain reliable contact; adhesive alone cannot bridge irregular alignment.
- ✅ Pre-cut to fit Ring Alarm Contact Sensors (2nd Gen), no measuring or trimming required
- ✅ No-drill installation avoids wall damage and visible marks
- ✅ Allows repositioning of sensors as safety priorities or mobility patterns change
- ✅ Affordable replacement that extends sensor life without buying new hardware
- ⚠️ Adhesive bond may fail on textured, porous, or improperly cleaned surfaces
- ⚠️ Requires careful surface preparation and firm application pressure for secure hold
- ⚠️ Cannot correct alignment gaps caused by uneven door trim without additional shims or risers
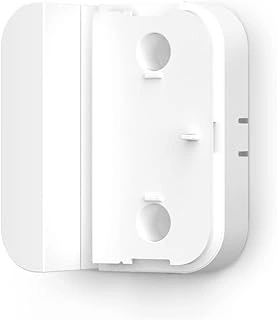
Amazon.com: Ring Alarm Contact Sensor Riser (2nd Gen) | Elevates Sensor for Crown Molding & Trim | Easy No-Tools Installation | Works with Ring Contact Sensors : Amazon Devices & Accessories
When contact sensors fail to trigger - or sound false alarms - the culprit is often a physical gap caused by crown molding, uneven trim, or door frames that sit higher than the adjacent wall. The Ring Alarm Contact Sensor Riser (2nd Gen) solves this alignment problem with a simple plastic spacer that elevates the sensor to match the height of its magnet counterpart.
The riser uses the same adhesive-only installation as the sensor itself: peel, press, and wait. No drilling, no anchors, no tools. This makes it particularly useful in a senior's home where you want to add monitoring without creating trip hazards from loose hardware or requiring a handyman visit every time you adjust placement.
Each riser is designed specifically for Ring Contact Sensors (2nd Gen), and at $9.99 per unit, it adds a small per-sensor cost. You'll only need risers where trim creates a noticeable gap - typically on doors with decorative molding or older window frames with stepped casings. If your parent's home has flat, flush surfaces, the standard sensor will sit close enough without help.
The alternative is improvised spacers - folded cardboard, foam tape, or plastic shims - but these tend to compress, shift, or degrade over time, leading to intermittent connectivity or missed alerts. Ignoring the gap altogether risks false open/close notifications that erode trust in the system and cause unnecessary worry.
The tradeoff is straightforward: if alignment is an issue, the riser provides a stable, purpose-built fix that preserves adhesive-only installation. If your doors and windows sit flat, skip it and allocate the budget elsewhere in your safety checklist.
- ✅ No-tools installation using adhesive backing
- ✅ Purpose-built to solve crown molding and trim gaps
- ✅ Maintains sensor reliability without improvised materials
- ✅ Matches Ring Contact Sensor (2nd Gen) form factor
- ⚠️ $9.99 per riser adds cost for each affected sensor
- ⚠️ Only necessary where uneven surfaces create gaps
- ⚠️ Designed exclusively for Ring 2nd Gen sensors
Who This Checklist Is For
This checklist is built for adult children who carry the weight of long-distance worry - the calls you make every morning to check in, the mental inventory of risks you run through while sitting in traffic or between meetings. It's for families who've had a close call: a fall in the bathroom, a stove left on, a missed medication dose that sent everyone into crisis mode. And it's for the parents themselves, who want to stay in their own home but recognize that a few smart adjustments might make that independence last longer.
The core challenge isn't just safety - it's autonomy. Most elderly parents don't want to feel watched, managed, or treated like children. They've spent decades making their own decisions, and the introduction of sensors, cameras, or monitoring tools can feel like a loss of dignity if handled poorly. This checklist assumes you want to reduce fall risk, catch emergencies earlier, and create visibility into daily routines without turning the home into a surveillance zone or stripping away privacy.
What this guide will do: give you a structured, room-by-room framework for identifying hazards, selecting appropriate smart devices, and having productive conversations about what gets installed and why. It will help you compare monitoring approaches - passive sensors versus cameras, local alerts versus cloud dashboards - and match them to your parent's actual routine and risk profile.
What it won't do: replace in-person care, diagnose medical conditions, or eliminate every possible risk. No checklist can prevent every fall or catch every health issue. The goal is to layer reasonable safeguards into the home environment so that small problems get noticed before they become emergencies, and so that both you and your parent can worry a little less.
If your parent is still highly independent, mobile, and cognitively sharp, this checklist will focus on passive monitoring and fall prevention. If they have moderate mobility limits, memory issues, or a history of incidents, you'll weight the list toward more active alerts and tighter coverage. And if you're managing care from another state, the emphasis shifts to tools that give you reliable daily check-ins without requiring your parent to remember to press a button or send a text.
This is not about making the home feel institutional. It's about making small, deliberate changes that let your parent stay in the place they know, with the routines they value, while giving you and the rest of the family enough information to intervene early when something goes wrong.
How to Choose the Right Monitoring Level
The right monitoring level depends on your parent's comfort with technology, their acceptance of surveillance, and the urgency of fall or wandering risk. Start with the least intrusive option that still addresses your biggest concerns, then adjust based on real incidents or changing needs.
Motion sensors alone offer high privacy and low complexity. They detect movement in key rooms - bathroom, bedroom, hallway - and alert you to unusual patterns, like no activity by mid-morning or repeated midnight trips. Because there's no camera, most seniors accept them without feeling watched. The tradeoff: alerts arrive after the fact, often minutes or hours later, so immediate intervention isn't possible. This approach works well when your parent is generally stable but you want early warning of routine changes.
Always-on video monitoring provides the fastest response. You see live footage the moment an alert fires, confirm whether help is needed, and talk through the camera if it has two-way audio. Reassurance is high for caregivers managing serious fall risk or cognitive decline. Privacy is low - cameras capture daily life, bathroom visits, and personal moments unless you disable feeds in sensitive rooms. Many seniors resist video, and constant access can feel invasive to both sides. Use this level only after explicit consent or when safety risk outweighs privacy concerns.
Hybrid systems combine motion or door sensors with optional cameras in shared spaces - living room, kitchen, front door - while keeping bedrooms and bathrooms sensor-only. You get faster context when an alert matters and preserve privacy where it counts. This balanced approach often wins long-term acceptance because your parent controls which rooms have video and you still catch critical events. Setup is more involved, requiring multiple device types and coordinated alerts, but flexibility makes it worth the effort for families navigating pushback.
Smartphone dependency matters more than most families expect. If your parent doesn't use a smartphone reliably - or you want backup caregivers like neighbors involved - choose a system that sends alerts via text, email, or dedicated pager. Video-heavy platforms often require app logins and fast mobile data, which can exclude non-technical users. Sensor-based systems with simple notification options keep everyone in the loop without forcing your parent or extended care team onto new devices.
Start minimal if your parent is resistant or risk is still moderate. Add a few motion sensors in high-traffic areas, set threshold alerts for unusual inactivity, and give everyone time to adjust. If you see a fall, a wandering episode, or a sharp decline in function, revisit the conversation and consider adding cameras to specific rooms. Escalate monitoring only when the data - or an actual incident - justifies the privacy tradeoff, and always explain what you're adding and why.
Installation Without Damage or Resistance
Installation resistance is one of the biggest barriers to smart home safety upgrades for elderly parents. Many seniors object not to the technology itself, but to holes in walls, visible damage, or the feeling that their home is being permanently altered without their consent. The method you choose shapes both acceptance and longevity of the system.
Adhesive-only systems preserve walls and reduce pushback. Most modern contact sensors, motion detectors, and hub mounts now ship with industrial-grade adhesive strips that bond to clean, dry surfaces without screws. For parents who rent, live in assisted living with strict modification rules, or simply value reversibility, adhesive mounts are the simplest path forward. They keep installation non-invasive, allow you to reposition devices if placement proves awkward, and can be removed without repair costs when circumstances change.
The tradeoff is surface preparation and longevity. Adhesive bonds fail on textured walls, dusty trim, or surfaces treated with silicone-based cleaners. Wipe each mount location with isopropyl alcohol, let it dry fully, and press firmly for 30 seconds. Even with proper prep, adhesive will eventually lose grip - plan to inspect and replace strips annually, especially in humid climates or on doors that slam frequently. Adhesive is also less secure for devices subject to tampering or impact, such as cameras mounted within reach or sensors on heavily used exterior doors.
Screw mounts offer permanence and stability but feel invasive to many elderly homeowners. Drilling into door frames, baseboards, or ceiling joists signals a loss of control and can trigger refusal, even when the modification is minor. If your parent is sensitive to change, save screw mounting for devices that truly require it - outdoor cameras, ceiling smoke detectors integrated with the smart system, or hub units too heavy for adhesive alone. For everything else, start with adhesive and escalate only if the device falls off repeatedly.
Risers and adapters solve many problem spots without tools. When a door frame is too narrow, a window sill is uneven, or a motion sensor needs slight angle adjustment, small plastic risers (often included in sensor kits) create the clearance or tilt needed while still using adhesive. Command-style picture hangers also work for lightweight hubs and cameras, offering more holding power than basic foam tape without requiring a drill.
Keep installation visible and explainable - never hide devices. Concealing sensors or cameras, even with good intentions, erodes trust and increases the chance your parent will disable or ignore the system entirely. Walk through each installation together, explain what the device does and why it's positioned where it is, and invite questions. If a motion sensor needs to face the hallway to detect falls, show the detection angle and confirm it feels acceptable. If a door sensor looks bulky on a bedroom frame, discuss whether a slimmer model or alternate placement works better. Collaboration improves both compliance and comfort.
For renters or temporary living situations, prioritize fully removable setups. Choose systems with no hardwired components, rely exclusively on battery-powered wireless devices, and avoid any modification that requires patching or painting on move-out. Many hub units sit on countertops and plug into standard outlets. Contact sensors, motion detectors, and leak sensors all come in peel-and-stick versions. Even smart locks are available in models that clamp over existing deadbolts without drilling, though these are bulkier and more visible. Removability isn't just about damage deposits - it also makes the system portable if your parent transitions to a new home or care setting.
Start small, test adhesive reliability, and expand based on what holds. Install two or three high-priority devices first - perhaps a front door sensor, a bedroom motion detector, and a bathroom leak sensor. Give them two weeks to prove the adhesive bond, check for any that sag or detach, and adjust surfaces or switch to screws only where necessary. This staged approach reduces upfront cost, builds familiarity gradually, and prevents the overwhelm that comes from installing a dozen devices in a single afternoon.
Testing and Adjusting Your Setup
Installation is only the first step - validation and adjustment turn a collection of sensors into a reliable safety system. Before your parent resumes normal routines, test every device individually: trigger each motion sensor by walking through its coverage zone, open every door and window contact, press call buttons, and verify that alerts reach the correct device or phone. Confirm that notifications are loud, clear, and distinct enough to prompt immediate action.
Next, observe your parent's typical daily routine. Walk alongside them through morning wake-up, bathroom visits, meal preparation, and evening wind-down. Note which sensors activate, which zones remain silent, and whether coverage gaps exist during high-risk activities such as nighttime hallway trips or stove use. This real-world walkthrough often reveals blind spots that floor plans alone cannot predict.
Sensitivity settings require careful calibration. Motion sensors set too high will trigger on pets, curtains, or passing cars; set too low, they may miss slow or seated movement. Door contacts need firm magnet alignment to avoid false open alerts. Start with manufacturer default settings, then adjust incrementally based on the first few days of logs. Record each change and its effect so you can reverse course if needed.
False alarms erode trust and acceptance faster than any other factor. If your parent dismisses three alerts in a row because the kitchen sensor fires every time the refrigerator cycles, they will ignore the fourth - even if it signals a real fall. Involve your parent in every adjustment: explain why a sensor is being moved, ask whether an alert tone is too startling, and confirm that check-in schedules fit their preferences rather than yours.
Establish a weekly maintenance routine during the first month. Check battery levels, test adhesive mounts for loosening, wipe camera lenses, and review alert logs together. This regular rhythm builds familiarity, catches hardware drift early, and reinforces that the system is a shared tool rather than surveillance. After the first month, extend the interval to biweekly or monthly based on system stability.
Refinement is iterative, not one-time. As your parent's mobility, sleep schedule, or daily habits shift, revisit sensor placement and alert thresholds. A setup that worked perfectly in July may need adjustment by October if arthritis worsens or daylight hours change. Track patterns over weeks, not days, and resist the urge to tweak settings after every single event. Stability matters as much as precision.
Document your final configuration: photograph sensor locations, note sensitivity levels in a shared notebook or app, and keep a printed map of coverage zones near the hub or router. This reference speeds troubleshooting when batteries die or after power outages, and ensures that any caregiver or family member can step in without guessing at your logic.
Final Takeaway: Start Small, Build Trust, Expand Thoughtfully
The most effective smart home safety setup is one that actually gets installed and used. Starting with every room at once often leads to overwhelm, device conflicts, and parent resistance. Instead, choose one high-priority area - usually the bathroom, bedroom, or main living space - install a small set of devices, and give everyone two weeks to adjust.
During that trial period, watch for false alerts, check that notifications reach the right people, and ask your parent how the devices feel. Do motion sensors trigger too often? Is a camera placement intrusive? Does a voice assistant respond reliably? Use this feedback to fine-tune settings before adding the next zone.
Remember that the goal is peace of mind and faster response when help is needed, not around-the-clock surveillance. Transparency matters: show your parent where sensors are placed, explain what each device monitors, and involve them in decisions about alert thresholds and who gets notified. This collaborative approach builds trust and increases the likelihood that devices stay powered on and properly positioned.
As mobility changes, cognitive needs shift, or new risks emerge, revisit your checklist quarterly. A parent who was steady on their feet six months ago may now benefit from additional motion sensors near stairs. Someone managing new medications might appreciate a smart pill dispenser with reminders. Treating the system as a living setup rather than a one-time installation keeps it relevant and effective.
Imperfect coverage today is better than a perfect plan that never launches. Even a single motion sensor in a hallway or a video doorbell at the front entrance can provide meaningful reassurance while you plan the next phase. Start small, build trust, and expand thoughtfully as both technology and needs evolve.