XINGBIRDS Microwave Oven Door Eject Button for KitchenAid and Whirlpool
Four proven solutions for making microwave buttons, stove dials, and appliance controls easier to see and use.
Fit and safety come first
Use the comparison as a shortlist, but keep fit, comfort, and any health or safety constraints ahead of price.
Flat glass panels and glossy black control strips have made modern kitchen appliances sleek - and frustratingly hard to read. If your mother struggles to find the microwave Start button or can't tell which stove dial controls the front burner, the problem isn't her vision alone; it's contrast and tactile feedback designed for showrooms, not everyday use.
You're looking at four types of solutions. Replacement button overlays snap or adhere over existing controls, adding size and contrast. Tactile dot markers create raised landmarks without covering the original label. Protective label covers magnify text and add color separation. Multi-shape tactile sets use different geometries - circle, square, triangle - so fingers recognize position by feel.
Each addresses a different combination of challenges. If she confuses similar buttons in low light, high-contrast overlays work. If she needs to confirm position without looking, raised tactile markers are the answer. If the appliance has tiny print on a busy this product, magnifying covers help. If multiple burners or settings blur together, distinct shapes provide spatial anchors.
The comparison ahead covers button and overlay dimensions, contrast ratios (measured in luminance difference), adhesive type and expected durability, appliance compatibility by control style, and whether the solution adds size, texture, or both. We'll show which product fits microwaves with membrane panels, which works on round stove knobs, and which survives steam and heat cycles. Your mother's independence depends on her ability to cook confidently without second-guessing every press and turn, so clarity on these trade-offs matters.
XINGBIRDS Microwave Oven Door Eject Button for KitchenAid and Whirlpool
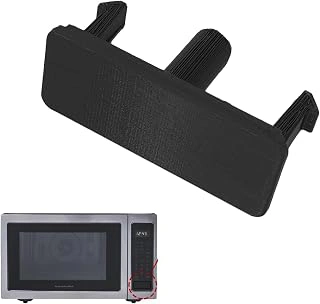
When the door button on your KitchenAid or Whirlpool microwave cracks, discolors, or stops working, a full replacement often restores both function and visibility better than an overlay. The XINGBIRDS Microwave Oven Door Eject Button is a direct-fit part priced at $14.99, designed for specific models in those two brands.
This white plastic button offers clear contrast against most microwave door panels, and its solid construction gives a firmer press feel than adhesive overlays. Buyers give it a 4.2 out of 5 rating, with most comments centered on straightforward installation - many report snapping the button into place in under a minute once the old part is removed.
Compatibility is narrow, so you need to verify your microwave's exact model number before ordering. The product page includes a list of compatible appliances; checking that list against the label inside your microwave door helps reduce the chance of a mismatch. If your model isn't listed, an overlay or tactile marker is a safer bet.
A replacement button makes sense when the original is damaged or missing, and when you want a permanent fix that matches the appliance's factory design. If your button is intact but hard to see, stick-on labels or high-contrast overlays cost less and apply in seconds without disassembly.
- ✅ Direct-fit replacement for select KitchenAid and Whirlpool microwave models
- ✅ White finish provides clear contrast on most door panels
- ✅ Quick snap-in installation reported by most buyers
- ✅ Restores original button feel and appearance
- ⚠️ Narrow compatibility - requires exact model-number match
- ⚠️ More expensive than adhesive overlays if button is intact
- ⚠️ Requires removing old button, which may involve light disassembly
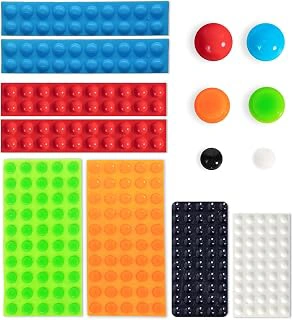
BLEWAY Bump Dots for Visually Impaired 280 Pc Combo Pack
The BLEWAY Bump Dots 280-piece combo pack offers a practical solution for anyone who wants to mark buttons and dials on multiple appliances at once. At $9.99, this set includes tactile dots in several sizes, allowing you to customize placement on stove knobs, microwave preset buttons, dishwasher cycles, and other frequently used controls throughout the kitchen.
Tactile feedback works differently than visual contrast alone. Instead of relying on color or printed text, raised bump dots let you locate and identify controls by touch. This approach is especially useful in low-light conditions, when hands are wet, or when reading small print becomes difficult. The variety of sizes in the combo pack means you can match the dot to the control: larger dots for stove burner knobs, smaller dots for microwave number pads or dishwasher touch panels.
The 280-piece count stands out when you consider how many controls a typical kitchen contains. A single microwave might need eight to twelve dots for presets and start buttons, while a four-burner stove uses at least four dots to mark the "off" position on each knob. Single-size packs often run short when you try to mark an entire kitchen, forcing a second order. This combo pack provides enough coverage to handle several appliances in one purchase, with extras for future replacement if adhesive wears over time.
With a 4.6 rating, buyers generally report that the dots adhere well to smooth plastic and metal surfaces and remain in place through regular use. The clear design preserves the original appearance of appliances while adding functional guidance. If you need to mark only one or two appliances and prefer uniform dot sizes for a tidier look, a single-size pack may suit you better. But for whole-kitchen coverage or households where multiple people benefit from tactile cues, the combo pack delivers better value and flexibility.
- ✅ 280-piece count covers multiple appliances in one purchase
- ✅ Multiple sizes allow customization for different controls
- ✅ Clear design preserves appliance appearance
- ✅ $9.99 price offers good value for whole-kitchen marking
- ⚠️ Variety of sizes may look less uniform than single-size packs
- ⚠️ Clear dots provide tactile feedback only, not visual contrast
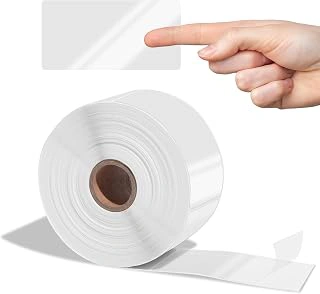
Aegis Adhesives 2" x 4" Clear Label Covers, 1 Roll 500 Labels
When you print custom high-contrast labels at home, the ink can smudge under wet hands or repeated cleaning. The Aegis Adhesives 2" x 4" Clear Label Covers protect your printed labels with a transparent, wipeable surface that extends their lifespan across hundreds of kitchen cycles.
This roll delivers 500 clear adhesive covers sized 2 by a larger amount, large enough to shield full-word labels on microwave keypads, oven dials, or dishwasher buttons. At $14.98 for the roll, each cover costs roughly three cents, a reasonable expense when you're labeling multiple appliances or replacing faded commercial stickers across a household. The 4.5 out of 5 rating reflects solid adhesion and clarity, though application does require careful alignment to avoid bubbles.
Compared to bare printed labels, adding a clear cover doubles your prep time - you'll print, trim, apply the paper label, then smooth the protective layer on top - but the tradeoff is durability. Uncovered inkjet or laser prints can fade within weeks if you wipe down controls daily; the clear shield keeps text crisp and legible for months. If you're marking only two or three appliances, a smaller pack of laminating pouches may be more economical. For families managing a full kitchen of devices - or senior-living coordinators outfitting shared spaces - the 500-label count means you won't run out mid-project and the cost per appliance drops significantly.
Use these covers when long-term readability matters more than one-time speed, and calculate your cost per labeled device to confirm the bulk quantity fits your scope.
- ✅ 500 covers per roll at $14.98, roughly 3 cents each
- ✅ 2" x 4" size fits full-word labels on most appliance controls
- ✅ Wipeable surface protects printed labels from smudging and fading
- ✅ Bulk count suits households with many devices or shared living spaces
- ⚠️ Requires extra prep time to align and smooth each cover
- ⚠️ 500-label quantity may exceed needs for households with only a few appliances
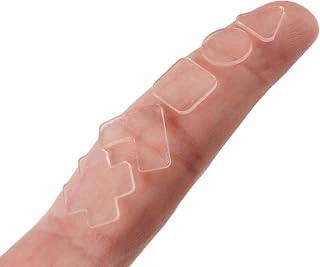
Bump Dots for Visually Impaired Combo Pack, 5 Tactile Shapes (Clear)
When different appliance functions require quick identification by touch alone, the Bump Dots for Visually Impaired Combo Pack offers five distinct tactile shapes - round, square, triangle, rectangle, and oval - at $9.99, the same price as the BLEWAY three-shape set. This shape variety lets users assign a unique tactile profile to each control: a round bump for timer, a square for bake, a triangle for broil, and so on, without needing to remember arbitrary placement.
The clear material blends with most appliance finishes, and the 4.6 rating suggests reliable adhesion and durability across microwave, oven, and cooktop surfaces. Because the pack divides quantity across five shapes rather than concentrating on one or two, you receive fewer duplicates of any single shape. That trade-off works well if your priority is coding distinct functions - start versus stop, high versus low - but less so if you need to mark many identical buttons across multiple appliances.
Shape coding reduces the cognitive load of counting buttons or memorizing position. A user who can feel the difference between a triangle and a circle will navigate a stovetop control panel more confidently than one relying on position memory alone. If your appliance layout changes or if you share the kitchen with others who rearrange controls, shapes remain consistent.
Consider whether your household will benefit more from marking eight microwaves with identical round dots or from labeling one oven with five unique shapes. The combo pack serves the latter scenario - fewer appliances, more functions per appliance, and a tactile vocabulary that distinguishes bake from broil at a fingertip's touch.
- ✅ Five distinct shapes enable intuitive function coding by touch
- ✅ $9.99 price matches the BLEWAY pack
- ✅ Clear finish suits any appliance color
- ✅ Reduces reliance on position memory
- ⚠️ Fewer duplicates of each shape than single-shape packs
- ⚠️ Shape variety may be unnecessary for simple on/off controls
Application Tips for Maximum Visibility and Durability
Proper surface preparation makes the difference between labels that last years and ones that peel within weeks. Wipe the appliance surface with rubbing alcohol and let it dry completely - grease and dust prevent adhesive from forming a strong bond. For button panels and control dials, this step is especially important since these areas collect cooking residue.
Alignment matters more than speed. Before peeling the backing, test placement with painter's tape or a small piece of masking tape to confirm the label won't block vents, overlap existing text awkwardly, or sit crooked. A clear ruler helps keep rows of tactile dots evenly spaced on stovetop dials. Once you've committed to the adhesive, press firmly for 15 - 20 seconds and avoid using the appliance heavily for 24 hours while the bond cures.
Check visibility under your actual kitchen lighting - overhead LEDs, under-cabinet strips, and natural window light all change how contrast appears. If a yellow label looks washed out under your bulbs, swap it for orange or black before applying the full set. Walk to the typical standing distance and squint slightly; if you have to lean in, the contrast isn't strong enough.
Framing these modifications as a practical upgrade rather than a medical accommodation can ease acceptance. Describe them as "clearer markings for everyone" or "a kitchen refresh to make cooking easier." Many people resist changes that feel like admissions of decline, but they'll use tools that simply make tasks less frustrating.
Removability varies by product. Silicone overlays and some vinyl labels peel off cleanly, while industrial-grade tactile dots often leave adhesive residue that requires Goo Gone or warm soapy water to remove. If you're uncertain about permanent placement or renting your home, start with the lowest-tack options and test a single label in an inconspicuous spot for a week before applying the entire set.
What to Do If Labels Don't Stick or Your Parent Resists the Change
When labels won't adhere properly or your parent refuses the modification, the project stalls before it can help. Both problems are common, and each has workable solutions.
Adhesive failure usually comes from grease film, textured surfaces, or heat exposure near the appliance controls. Before applying any label or overlay, clean the surface with a kitchen degreaser or rubbing alcohol and let it dry completely. If the appliance has a textured finish, light sanding with fine-grit paper can create a smoother bond area without damaging the appearance. For high-heat zones near stovetop controls, look for labels rated to at least 200°F, or use mechanical overlays that clip or frame around the control panel rather than relying on adhesive alone. When a label still lifts at the edges, a thin coat of clear acrylic sealer around the perimeter can lock it down.
Emotional resistance is harder to troubleshoot but just as real. Many older adults interpret modifications as a signal that independence is slipping away. Start with a single appliance - the microwave is often the least threatening - and frame the change as a convenience upgrade rather than a corrective measure. Involve your parent in the choice of color, size, or label style so the modification feels collaborative, not imposed. Emphasize that the goal is to reduce frustration and save time, not to compensate for decline. If resistance persists, pause and revisit the conversation after a week or two; forcing the issue can damage trust and make future safety discussions harder.
Combining patience with practical prep work gives modifications the best chance to succeed and stay in place.
How to Choose the Right Labels and Overlays for Your Parent's Appliances
- Check whether the appliance has flat buttons, raised dials, or recessed controls - each type takes a different label or overlay approach.
- Measure button size and spacing before ordering overlays or dots to avoid misalignment.
- Decide whether your parent needs visual contrast, tactile feedback, or both.
- Verify brand and model compatibility for replacement buttons like the XINGBIRDS unit.
- Count the number of appliances you want to label - combo packs offer better per-unit cost for multiples.
- Consider whether shape coding (five tactile shapes) will help differentiate functions or cause confusion.